Capturing Lightning
A quick how-to on capturing lightning photos…

STEP 1: know that the elements won’t wait…
- A good philosophy for photography in general is to always ask “if not now, then when?”
- High vantage points are always good for capturing lighting, but be safe.

- MOST IMPORTANTLY, always be isolated from direct paths to ground.
 It’s nice to feel like the vehicle provides some protection from being electrocuted. When photographing lightning, I’m always in an enclosure that I think is isolated well enough, often assuming my truck’s rubber tires will protect me on a mountain top. Though, this actually has little to do with why it’s safe. My friend, Dr. Robert Svensson reminded me that my safety is “due to the fact that the current flows outside the car body…This is also called Faraday’s Cage.” ..should I take a direct hit from a bolt of lightning.
A hatched back vehicle can make for a nice Faraday Cage and mobile enclosure. Additionally, I’ve found that if I can maintain a positive air pressure in the enclosure I’m shooting from relative to the outside conditions, it really helps keep some of the rain and wind spray off my lens.
STEP 2: have a bomb dig camera
- Any of today’s DSLR camera’s a good for capturing lightning, along with point and shoots that have manual controls (and/or long shutter length ability (e.g. 1″ to 30″).
- It’s very hard to shoot lightning during the day without a special lightning trigger, so I normally try to shoot lightning at night or late evening.
- I shoot on manual. If I don’t have a shutter release remote/trigger then I use ~8″-15″ shutter speeds. If I have a shutter release then I use Bulb Mode so I can close the shutter whenever I see a pretty bolt (assuming I had it open).
- I set my focus to manual, and the focal length at infinity.
- ISO, Shutter Speeds, and Aperture highly vary depending on the distance the storm is away, relative brightness from the surroundings (foreground/background), and the intensity of the lightning. Long shutter speeds are a good place to start the tuning, keeping the ISO in a range the camera can handle without being too noisy. Nikon’s D800 can be dialed up to an ISO Level of 3200 before image quality starts to suffer… though for lightning I typically shoot between an ISO of ~200- 800. My f-stop stay’s between 5.6 and 14 most often, though if the lightning is way off in the distance I may open it up to f/2.8.


- Iterative shooting is key to getting the right balance of settings in the wild light environment produced by lighting….meaning I take a picture, see what happens, and change the settings according to the previous shot to make the following shot better (hopefully)…
- It’s great to have a remote shutter release..really really great! if I can’t find it or the remote batteries are dead, a timed delay when taking each shot works well to reduce vibration.


STEP 3: have a bomb dig tripod
- I like Manfrotto’s 190XPROB, it’s not the lightest tripod out there, but it’s extremely versatile. I’ve had it for about 4 years and it still performs like the fist day I bought it. It’s been buried in sand, submerged in rivers, hung on rock faces, wedged in glaciers…It’ll take some abuse. Superior Photo in Morgantown, WV is where I picked mine up, and here’s a link to a video demo about the 190XPROB if anyone’s interested in what makes this tripod uber handy for a wide array of situations.


My D800 & the 190XPROB w/wireless shutter release
STEP 4: be creative and motivated to shoot photos of lightning
- I try to keep my camera gear near me, always. My worst dreams in the last few years have been of either falling, or not having my camera when I need it. I also rarely remove my tripod mount from my camera (it helps keep me from miss placing it).

STEP 5: have patience, you will miss the coolest shots
- This can’t be stressed enough, as the lightning photos I’ve been able to catch thus far are most definitely NOT the prettiest strikes I’ve witnessed whilst trying to align a composition toward an unknown moment/event that is a bolt of lightning.
 This was the first lightning photo I ever captured, back in 2008. There appears to be a tornado like storm funneling to the ground. This shot was taken on a hill top in Preston County, WV looking over Albright toward Terra Alta.
STEP 6: check out the Lightning Gallery on my webpage..
- like it, share it, Pin It…spread the good word!
- Please post questions and comments, as I quite enjoy feedback and the sharing of knowledge.

Special thanks to my girlfriend, Tara Smith, for the Step titles in this post.


Trackbacks & Pingbacks
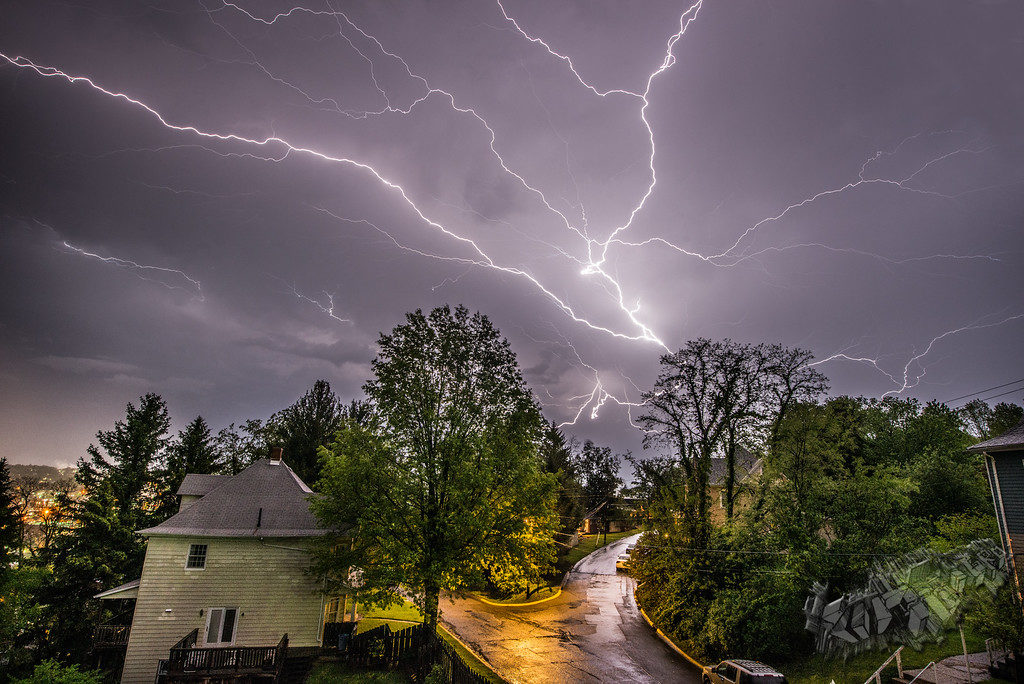
[…] Last night’s storm produced some nice visuals over town. These shots are from atop South Park, looks toward downtown. They’re composite images made from several exposures where I caught individual or coupled lightning strikes. If you like these shots, check out my how-to post on capturing lightning. […]
Leave a Reply
Want to join the discussion?Feel free to contribute!